Cloudflare Queues is now part of the Workers free plan, offering guaranteed message delivery across up to 10,000 queues to either Cloudflare Workers or HTTP pull consumers. Every Cloudflare account now includes 10,000 operations per day across reads, writes, and deletes. For more details on how each operation is defined, refer to Queues pricing.
All features of the existing Queues functionality are available on the free plan, including unlimited event subscriptions. Note that the maximum retention period on the free tier, however, is 24 hours rather than 14 days.
If you are new to Cloudflare Queues, follow this guide or try one of our tutorials to get started.
Cloudflare Workflows now automatically generates visual diagrams from your code
Your Workflow is parsed to provide a visual map of the Workflow structure, allowing you to:
Understand how steps connect and execute
Visualize loops and nested logic
Follow branching paths for conditional logic
You can collapse loops and nested logic to see the high-level flow, or expand them to see every step.
Workflow diagrams are available in beta for all JavaScript and TypeScript Workflows. Find your Workflows in the Cloudflare dashboard to see their diagrams.
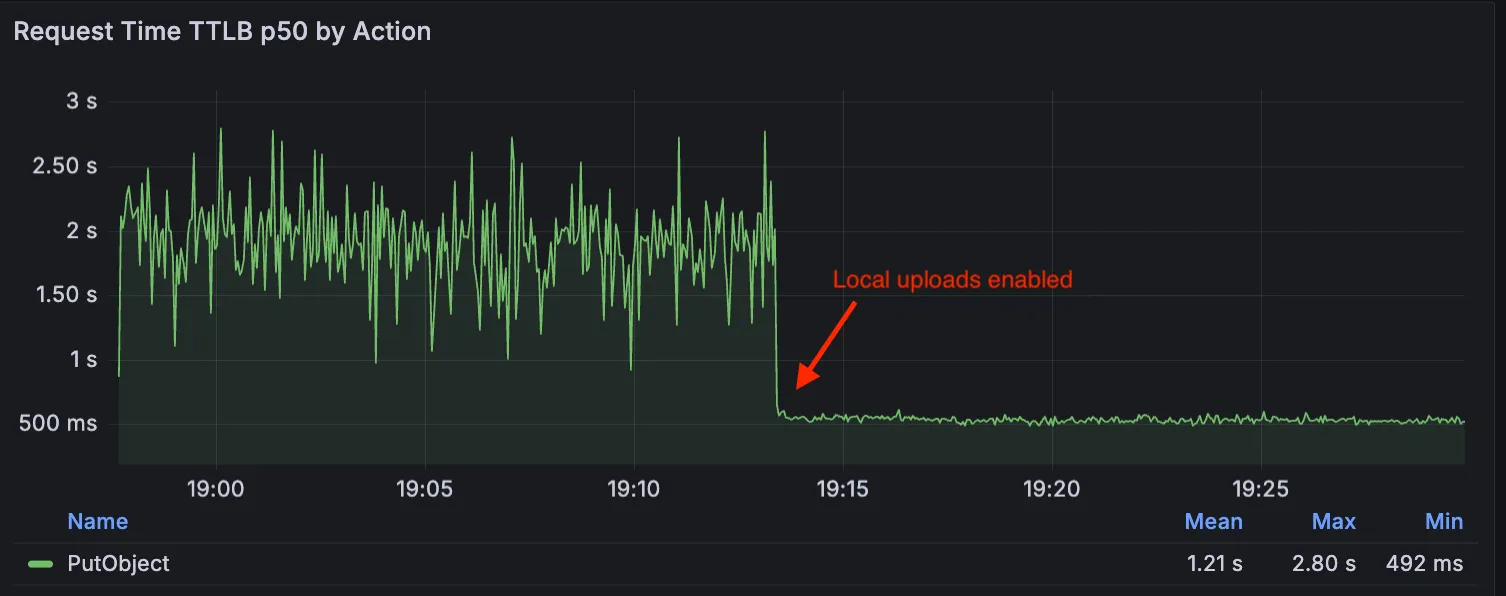
Local Uploads is now available in open beta. Enable it on your R2 bucket to improve upload performance when clients upload data from a different region than your bucket. With Local Uploads enabled, object data is written to storage infrastructure near the client, then asynchronously replicated to your bucket. The object is immediately accessible and remains strongly consistent throughout. Refer to How R2 works for details on how data is written to your bucket.
In our tests, we observed up to 75% reduction in Time to Last Byte (TTLB) for upload requests when Local Uploads is enabled.
This feature is ideal when:
Your users are globally distributed
Upload performance and reliability is critical to your application
You want to optimize write performance without changing your bucket’s primary location
To enable Local Uploads on your bucket, find Local Uploads in your bucket settings in the Cloudflare Dashboard, or run:
Enabling Local Uploads on a bucket is seamless: existing uploads will complete as expected and there’s no interruption to traffic. There is no additional cost to enable Local Uploads. Upload requests incur the standard Class A operation costs same as upload requests made without Local Uploads.
The latest release of the Agents SDK brings first-class support for Cloudflare Workflows, synchronous state management, and new scheduling capabilities.
Cloudflare Workflows integration
Agents excel at real-time communication and state management. Workflows excel at durable execution. Together, they enable powerful patterns where Agents handle WebSocket connections while Workflows handle long-running tasks, retries, and human-in-the-loop flows.
Use the new AgentWorkflow class to define workflows with typed access to your Agent:
getCallableMethods() — Introspection API for discovering callable methods
Connection close handling — Pending calls are automatically rejected on disconnect
JavaScript
awaitagent.call("method", [args],{
timeout:5000,
stream:{onChunk,onDone,onError},
});
TypeScript
awaitagent.call("method", [args],{
timeout:5000,
stream:{onChunk,onDone,onError},
});
Email and routing enhancements
Secure email reply routing — Email replies are now secured with HMAC-SHA256 signed headers, preventing unauthorized routing of emails to agent instances.
Routing improvements:
basePath option to bypass default URL construction for custom routing
Server-sent identity — Agents send name and agent type on connect
New onIdentity and onIdentityChange callbacks on the client
JavaScript
constagent=useAgent({
basePath:"user",
onIdentity:(name,agentType)=>console.log(`Connected to ${name}`),
});
TypeScript
constagent=useAgent({
basePath:"user",
onIdentity:(name,agentType)=>console.log(`Connected to ${name}`),
});
Upgrade
To update to the latest version:
npmiagents@latest
For the complete Workflows API reference and patterns, see Run Workflows.
The minimum cacheTtl parameter for Workers KV has been reduced from 60 seconds to 30 seconds. This change applies to both get() and getWithMetadata() methods.
This reduction allows you to maintain more up-to-date cached data and have finer-grained control over cache behavior. Applications requiring faster data refresh rates can now configure cache durations as low as 30 seconds instead of the previous 60-second minimum.
The cacheTtl parameter defines how long a KV result is cached at the global network location it is accessed from:
// Read with custom cache TTL
constvalue=awaitenv.NAMESPACE.get("my-key",{
cacheTtl:30,// Cache for minimum 30 seconds (previously 60)
});
// getWithMetadata also supports the reduced cache TTL
Magic WAN and Magic Transit customers can use the Cloudflare dashboard to configure and manage BGP peering between their networks and their Magic routing table when using IPsec and GRE tunnel on-ramps (beta).
Using BGP peering allows customers to:
Automate the process of adding or removing networks and subnets.
Take advantage of failure detection and session recovery features.
With this functionality, customers can:
Establish an eBGP session between their devices and the Magic WAN / Magic Transit service when connected via IPsec and GRE tunnel on-ramps.
Secure the session by MD5 authentication to prevent misconfigurations.
Exchange routes dynamically between their devices and their Magic routing table.
We have partnered with Black Forest Labs (BFL) again to bring their optimized FLUX.2 [klein] 9B model to Workers AI. This distilled model offers enhanced quality compared to the 4B variant, while maintaining cost-effective pricing. With a fixed 4-step inference process, Klein 9B is ideal for rapid prototyping and real-time applications where both speed and quality matter.
The model hosted on Workers AI is optimized for speed with a fixed 4-step inference process and supports up to 4 image inputs. Since this is a distilled model, the steps parameter is fixed at 4 and cannot be adjusted. Like FLUX.2 [dev] and FLUX.2 [klein] 4B, this image model uses multipart form data inputs, even if you just have a prompt.
With the REST API, the multipart form data input looks like this:
The parameters you can send to the model are detailed here:
JSON Schema for Model
Required Parameters
prompt (string) – Text description of the image to generate
Optional Parameters
input_image_0 (string) – Binary image
input_image_1 (string) – Binary image
input_image_2 (string) – Binary image
input_image_3 (string) – Binary image
guidance (float) – Guidance scale for generation. Higher values follow the prompt more closely
width (integer) – Width of the image, default 1024 Range: 256-1920
height (integer) – Height of the image, default 768 Range: 256-1920
seed (integer) – Seed for reproducibility
Note: Since this is a distilled model, the steps parameter is fixed at 4 and cannot be adjusted.
Multi-reference images
The FLUX.2 klein-9b model supports generating images based on reference images, just like FLUX.2 [dev] and FLUX.2 [klein] 4B. You can use this feature to apply the style of one image to another, add a new character to an image, or iterate on past generated images. You would use it with the same multipart form data structure, with the input images in binary. The model supports up to 4 input images.
For the prompt, you can reference the images based on the index, like take the subject of image 1 and style it like image 0 or even use natural language like place the dog beside the woman.
You must name the input parameter as input_image_0, input_image_1, input_image_2, input_image_3 for it to work correctly. All input images must be smaller than 512×512.
This release contains minor fixes, improvements, and new features.
Changes and improvements
Improvements to multi-user mode. Fixed an issue where when switching from a pre-login registration to a user registration, Mobile Device Management (MDM) configuration association could be lost.
Added a new feature to manage NetBIOS over TCP/IP functionality on the Windows client. NetBIOS over TCP/IP on the Windows client is now disabled by default and can be enabled in device profile settings.
Fixed an issue causing failure of the local network exclusion feature when configured with a timeout of 0.
Improvement for the Windows client certificate posture check to ensure logged results are from checks that run once users log in.
Improvement for more accurate reporting of device colocation information in the Cloudflare One dashboard.
Known issues
For Windows 11 24H2 users, Microsoft has confirmed a regression that may lead to performance issues like mouse lag, audio cracking, or other slowdowns. Cloudflare recommends users experiencing these issues upgrade to a minimum Windows 11 24H2 KB5062553 or higher for resolution.
Devices with KB5055523 installed may receive a warning about Win32/ClickFix.ABA being present in the installer. To resolve this false positive, update Microsoft Security Intelligence to version 1.429.19.0 or later.
DNS resolution may be broken when the following conditions are all true:
WARP is in Secure Web Gateway without DNS filtering (tunnel-only) mode.
A custom DNS server address is configured on the primary network adapter.
The custom DNS server address on the primary network adapter is changed while WARP is connected.
To work around this issue, reconnect the WARP client by toggling off and back on.